My Google Apps Journey: Creating users

Here’s Part 3 of My Google Apps Journey.

It’s just three weeks before the start of school last August, and I had just signed up with Google Apps Education Edition. Now I needed to create user accounts, give each student an email address, and make some email distribution lists.

Good thing Google lets you create multiple users. I was not about to type in each student one by one! Instead, I asked the school’s registrar for an Excel spreadsheet of our students. I was happy to hear that this wasn’t an arduous task; she got the file to me the same day.

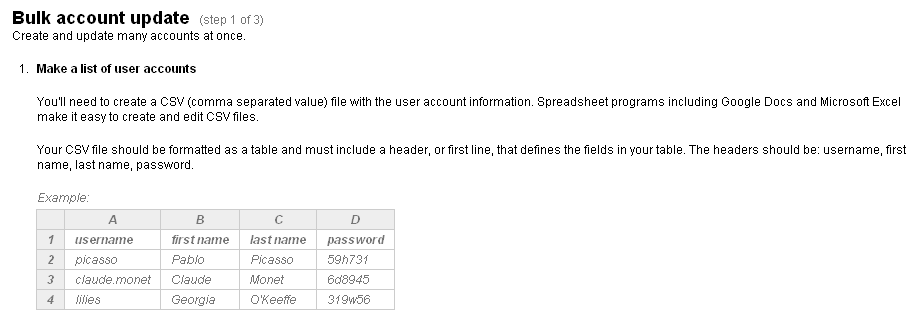
Then, I followed the directions to create a CSV file to import.

Create user accounts

The only question was what to use as the standard username format. Should it be first initial, last name? First name, last name? I decided to go with a student’s full name because (1) it was simple and professional, (2) I didn’t want to have a lot of identical user accounts.

Another question to consider was what to do with initial passwords. I decided to assign the same generic password to all accounts. Luckily, Google has an option where users must create a new password the first time they log in, which made things much easier when getting students registered.

I was pleased with how simple this process was. About 10 minutes of work yielded user accounts and email addresses for every student at the school. Gone were the days of sporadic email usage. No longer would teachers have to ask for their students’ email addresses or help them one on one to get accounts. Now all students could easily communicate with their teachers and collaborate with their peers, not to mention place their professional emails on their resumes and job applications. This new system would even help us track our graduates better to see how they’re doing in college.

When I told my colleagues, they were happy, but unfortunately, many did not grasp the thousands of hours of work this change saved. Besides time, this change made a huge dent in our school’s digital divide because now all students had access no matter their computer skills or technology situation at home.

(Update, one year later: Teachers have definitely realized the power of moving to Google Apps. Even something small like inputting email addresses into www.mygradebook.com gets done in a snap.)

Although creating new users was easy, putting them into email distribution lists was not as simple. I wanted to create an easy way for the school to communicate with groups of students. For example, I wanted email accounts like students@, classof2012@, and so on. Maybe I haven’t figured an easy way to do this yet (can anyone help me?), but I found the process quite cumbersome. In fact, one year later, it’s not clear whether all the distribution lists are updated and accurate. It’ll probably take a couple hours of clean-up, which doesn’t sound bad, but I wish there were an easier way.

All in all, my Google Apps journey was going really well. The next step would be to pitch the change to staff and find out the easiest way to introduce students to the new system. Stay tuned!
Teachers: There’s no reason to Evernote

evernote logo

Every once in a while, a trendy application comes out that makes me wonder, “Do we really need that?”

First it was Twitter. Now it’s Evernote.

Evernote, hardly a newcomer to online notetaking, lets you save and organize web clippings, photos, and handwritten notes, among other things. It wants to become “your second brain” or “your external brain.”

I don’t want any of my brains to be that disorganized.

Maybe it’s just that I’m a teacher and I can’t see myself walking around the supermarket taking pictures of sake labels, as CEO Phil Libin from Evernote seems to do, given this promo video. (He also likes ninja shirts.) (He also uses Evernote to remember where he put his car.)

Let me be fair: I’m all for organization, and Evernote claims to organize your life. Whatever notes you create — whether by typing them, clipping them from a website, or taking a picture of them — are accessible online from any device, including your mobile phone.

The problem is, the service encourages you not to organize your stuff. Sure, it lets you tag notes and create notebooks. But all their advertising suggests don’t! Instead, save everything all in one place and then search for it later! Evernote is “a tool for lazy slobs,” Phil says. Well, perhaps there are many people out there who can get away with loose organization systems, but teachers in general cannot.

Evernote’s photo + OCR capability makes things even worse, particularly if you have an iPhone. Because it can scan pretty much anything you throw at it, there’s no reason not to start taking pictures of all your student work. Yes, you can do this with Evernote, but that doesn’t mean you should. It becomes anti-organization overkill.

I’ve spent several hours over the last couple months trying to make Evernote work for me. After all, Lifehacker called it “the most popular note-taking application.”  But I just don’t get it. It’s clunky, it’s complicated, it just doesn’t work for me.

Of course, some people would say the same thing about Google Apps and Live Mesh, so I would be happy to hear from teachers who find Evernote helpful. Please let me know how you use it!

My Google Apps Journey: Signing Up

Back to my Google Apps story! In a previous post, I explained how I got the idea last year to bring Google Apps to my school. Now came the crucial part: signing up. After all, having an idea is one thing; making that idea a reality so that it’s a systemic part of your school is another.

Despite my excitement, I had a lot of questions: Would signing up for Google Apps Education Edition be easy? Would it really be free, or would there be a catch? And would there be support if I got stuck?

(You may ask, What about getting IT support for the shift? I have to say, That part was easy for me. My school is relatively small, and there was a definite need, so it took just one conversation with the Director of Technology to get the ball rolling. If you’re in a big school, there may be more hoops. Here are 10 Reasons to try it.)

It was June, and school was out, so I had a lot of time to make mistakes and do things the right way. Tip: Don’t try a major tech overhaul in the middle of the year. I found out quickly, though, that the process was easy. Google even has a six-week integration plan to help you get started.

First I had to buy a domain name. This seemed daunting but ended up fairly easy. There are a number of web hosting companies, and after a few minutes of research, I decided on Go Daddy. The hardest part was to find a domain that had not yet been taken but that would be short enough and simple enough for students to remember. After all, nobody wants an email address like markisero@thepublichighschoolinsanfrancisco. I persevered, found a good domain name, paid the $10, and had my first big realization: All my students are going to have free accounts for just $10 a year!

This can’t be true, I thought. Well, it was.  I found that out by doing the second step, signing up for Google Apps. This was ridiculously easy. I typed in just three pages of information, and I was done. Really? Yep.

As a non-techie kind of guy, the only slightly challenging part was the last. I had to “verify domain ownership,” which means I had to prove to Google that I indeed owned the domain on which they were going to add hundreds of free email accounts. This sounded tricky, but fortunately, the site gave me two options: (1) creating a CNAME record, or (2) uploading an HTML file. I chose the first one, which required me to go back to my domain on Go Daddy and change some settings, and within five minutes, I was finished. Yes, it was really that easy.

Even had I stumbled, I could have relied on Google’s support information and videos. It’s remarkable how such a powerful service was so easy to implement. What I thought was going to be hard ended up being easy.

And now, I could focus on the fun part: creating users, setting up all the services, and deploying Apps at my school. It was still June, so I had a lot of time to get ready for the upcoming year.

Live Mesh + Scanner = No Paper!

It’s the summer, so in addition to relaxing, I’m finally making huge progress on something I call Project Scan.

I just finished my 12th year teaching, so this means I’ve created and accumulated thousands of documents. No matter how organized I am, I’m still left with piles of paper: student records, readings on educational equity, a random lesson plan a colleague gave me. Some of these piles make their way into binders; others stay in file cabinets; still others are on a table in my classroom, ready for me to organize them when I get back in August.

Up until now, I’ve had two strategies to organize this whole mess: (1) Recycle stuff quickly, (2) Get as much of the stuff in electronic form as possible.

I’m good at throwing stuff out. My belief is, If a paper document is important enough, it’ll come back to you. One year I tested this philosophy by never taking handouts at staff meetings, and I have to say, nothing horrible happened.

On the other hand, I haven’t much liked converting documents into electronic form. Before Google Docs, my colleagues would habitually print out their work and then wonder why nobody could find it the following year. Even when they sent an email attachment, it would get lost. When kids are buzzing around you, who wants to click the attachment, download, find the precise folder, and save?

I knew I needed to do something about this, so last year, I splurged ($339 on Amazon) and bought a Fujitsu ScanSnap S510. I like gadgets, especially when they’re helpful, and so far, this scanner has been wonderful. It can scan stacks of 50 pages at a time, and it’s very quick. Immediately, I resolved to get my piles of paper down to a reasonable size.

Everything was going great until I hit a snag: Where should I save these files? After all, the scanner could connect with only one of my three computers (home computer, school computer, laptop) at a time. It would make sense that everything would go on my school computer. But what if I’m planning a lesson at home and need a document I scanned at school? What if a parent called me in the evening to inquire about her child’s student records? And what if I wanted to scan my bills and personal documents?

For a few months, I lugged the scanner around, coming up with a crazy system whereby all three of my computers housed some of the documents. I found myself holding on to documents waiting to scan them in a different location. That meant organizing papers to get ready to organize them. I got anxious. After all, shouldn’t technology make things simpler?

Enter Live Mesh. I’ve already written about how Live Mesh can organize your Microsoft Office documents. With a high-speed scanner, Live Mesh’s power becomes even more apparent. It means that every piece of paper — a colleague’s hand-written notes, a student’s essay, your electric bill — can disappear.

Better still, saving it on my home computer means saving it to all of my three computers. No matter what machine I’m at, the document is in the same place. When a student asks for something, it’s nice to be able to find it in less than five seconds.

I’m happy to report that I finished up Part 1 of Project Scan today. All of last year’s school documents are safely stored on my Live Mesh. What’s Part 2, you ask? Stay tuned!

My Google Apps Journey: The Beginning

I promised you stories, so here’s one. It all started about a year ago when a student tried to print an essay on a school computer using his flash drive. The problem was, the drive had the virus Disk Knight on it.

And then things went crazy.

Pretty soon Disk Knight had infected the majority of computers on campus. While we dealt with the problem, I started thinking that it might be time for a better way.

For too long, our school’s technology had too many moving parts. For example, we used Microsoft Office at school, but students used Works or WordPerfect at home. (This tech divide is typical in urban schools.) Some students ended up spending more time learning about file formats than doing their work. And it left everybody frustrated.

All of this mayhem led me to think about trying out Google Apps Education Edition, which includes free email accounts and collaborative online word processing, spreadsheet, and presentation applications.

The free email got my attention at first. Up until Google Apps, not all of our students had email accounts. If they did, they ran the gamut. How would you like to email a student at pimpdaddy11, babyangel89, or my favorite, xxx_califoneeyas_finest_xxx? The idea of a common, professional email account structure for all students sounded perfect.

But what ultimately got me to sign up for Google Apps was its simple, easy-to-use office applications. I’ll say more in an upcoming post, but it became clear very quickly that Google Apps would solve nearly all of the problems our students were experiencing. No more flash drives. No more viruses. No more anxiety about file formats. No more emailing documents to yourself. And, most important, no more lost work.

With that vision in mind, I began taking steps to make Google Apps a reality at our school.